UCPA Compliance in WordPress: The Ultimate Beginner’s Guide

When I first set up my WordPress website, adhering to privacy regulations seemed relatively simple. A privacy policy was all it took, along with a few updates to the terms of service.
However, the landscape has changed considerably over the past few years. States like Utah have enacted stringent privacy regulations that impact businesses worldwide, regardless of their location.
According to the Utah Consumer Privacy Act (UCPA), businesses can incur fines up to $7,500 for each violation. Unfortunately, much of the guidance surrounding these regulations is aimed at legal professionals rather than WordPress users who simply seek compliance.
If you’re confused about what actions you need to take, you’re not the only one. This guide is designed to assist ordinary website owners in grasping the UCPA and how to implement its requirements within WordPress.
I’ve dedicated considerable time to researching this law, testing various tools and plugins to ensure you can concentrate on what truly matters: expanding your business.
Disclaimer: We’re not legal experts. This article solely aims to inform and does not provide legal advice. Consulting a qualified legal professional is strongly advisable to ensure that your business fully complies with the UCPA and other privacy regulations.
What is the Utah Consumer Privacy Act (UCPA)?
The Utah Consumer Privacy Act (UCPA) is a legislation aimed at safeguarding the personal information of residents in Utah. It outlines the protocols for how businesses should gather, utilise, and preserve sensitive data.
In this law, personal data refers to any information that can identify an individual, including names, email addresses, IP addresses, and even device identifiers.
The UCPA is applicable to businesses in various locations, not limited to those based in Utah or the United States. If your website processes data from individuals residing in Utah, the UCPA may be relevant to you.
It’s essential to understand that the UCPA does not pertain to every WordPress blog or site. Rather, it targets larger companies that meet specific criteria.
First, you must be engaged in business within Utah or offer goods or services aimed at Utah residents.
Secondly, your enterprise must generate an annual revenue of $25 million or greater.
Moreover, you must meet at least one of the following conditions regarding data processing:
- Control or process the personal data of 100,000 or more Utah consumers.
- Derive over 50% of your total revenue from the sale of personal data and control or process data from 25,000 or more Utah consumers.
These criteria are relatively specific, especially when compared to other privacy regulations.
If your business meets these conditions, it is crucial to ensure compliance with the UCPA.
Why Should WordPress Users Care About UCPA Compliance?
Violating the UCPA can lead to hefty fines. If your business is found in violation, the Utah Attorney General will issue a formal notice, allowing you 30 days to resolve the issue—a period referred to as a ‘cure period.’
If not addressed within this timeframe, fines can be issued.
The penalties can accumulate rapidly for applicable businesses. For instance, mishandling the data of 100 Utah residents could result in fines reaching $750,000.
How UCPA Affects Your WordPress Site
The UCPA is focused on providing consumers with specified rights regarding their personal information.
Some of the key consumer rights that may impact your WordPress website include:
- The Right to Know: Users have the right to inquire about the personal information you collect from them, requiring transparency in your data practices.
- The Right to Correction: Users can request corrections for any inaccurate data held about them.
- The Right to Delete: Users can ask for their personal information to be erased.
- The Right to Data Portability: Users can request a copy of their data in an easily accessible format.
- The Right to Opt-Out of Data Sales: Users have the ability to prevent their personal data from being sold.
- The Right to Opt-Out of Targeted Advertising: Users can choose not to have their data used for personalized advertising.
Next, I’ll guide you through how to meet these UCPA requirements with the right WordPress tools and best practices.
How to Ensure Your UCPA Compliance in WordPress
Navigating UCPA compliance may seem daunting initially. At its essence, it’s about ensuring clarity for your users and giving them agency in how their personal data is collected and used.
Let’s explore the steps you can take. You can use the following links to navigate to specific sections:
Execute a Data Audit
To start, you need to gain a thorough understanding of your own data practices. This involves examining and documenting every piece of personal data your website collects, processes, or retains.
Begin by compiling a list of all the WordPress plugins and external tools interacting with user data—this spans everything from analytics and email marketing utilities to form creators and SEO plugins.
Once listed, scrutinise how each tool manages user information.
For example, if you have a quote request form, your form builder might collect details such as the visitor’s name, company name, or job title.
Consider these questions for deeper insight:
- What personal data do I collect? This may encompass names, email ids, IP addresses, payment details, or any other identifying information.
- Where is this data stored? Is it kept on your server, or is it transferred to a third-party service?
- Why am I collecting this data? Is it indispensable for your website’s operation, or is it just something extra?
- What is the duration of data retention? Do you have a transparent policy for how long this data is stored?
- Am I sharing this data with third parties? Are you forwarding it to service providers, advertisers, or analytics tools?
This audit will quickly reveal areas needing updates to align with UCPA requirements.
Draft a Data Compliance Document
Following your data audit, the next step is to put your findings in writing. Document every action you’ve taken toward UCPA compliance and any updates made to rectify identified issues.
Having this record demonstrates your commitment to safeguarding user privacy, which can be invaluable if you’re subject to an audit or face inquiries about your compliance.
As I’ll touch upon throughout this guide, it’s insufficient to merely comply with UCPA regulations behind closed doors; you must also demonstrate that compliance.
For each type of data collected, record the following:
- The data’s source (e.g., forms, plugins, or external tools)
- The purpose of the collection (whether it is essential or optional)
- The manner in which the data is used, shared, or sold
- The duration of storage
- Any special categorisation (such as sensitive or financial data)
- Security measures in place to protect it
- Any third-party providers or contracts involved
Such documentation will assure regulators and users that you take privacy seriously.
As a best practice, consider performing a comprehensive data audit at least annually. It’s also prudent to revisit compliance when new plugins are added, data collection methods are altered, or significant site updates occur.
Moreover, considering that laws may evolve, regularly re-evaluate your compliance in response to updates to the UCPA.
Reduce Data Collection
Unlike other privacy regulations, the UCPA allows the collection of non-essential personal data, provided you offer an explicit privacy notice and opt-out options. Still, adhering to the principle of data minimization is advisable. This means only collecting information that is absolutely necessary.
Data minimization simplifies UCPA compliance because:
- Your workload decreases when responding to user data requests.
- There’s less that needs deletion if a user requests to be forgotten.
To start, review your site’s forms and tools. Ask yourself: “Is every detail I’m requesting truly necessary?”
If the answer is no, it’s best to cease collecting that information.
Develop a Privacy Policy
A privacy policy is a critical page that outlines the personal data you collect, its usage, and sharing practices.
Crafting a comprehensive privacy policy is crucial for UCPA compliance, as it informs visitors about your approach to their information. Additionally, it aligns with their Right to Know under the law.
Fortunately, WordPress has a built-in privacy policy generator available via Settings » Privacy in your dashboard.
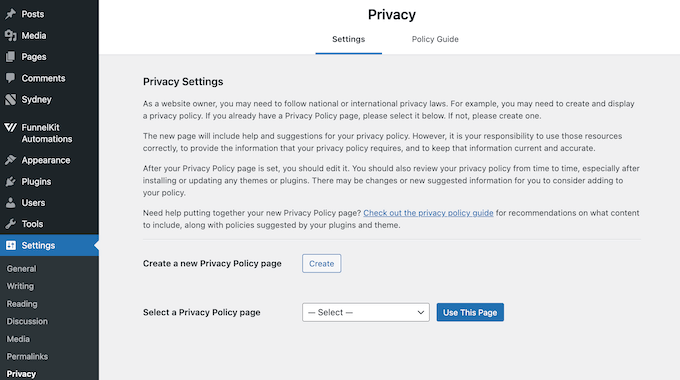
You are welcome to use our WPBeginner privacy policy page as a model.
Just ensure to substitute every instance of ‘WPBeginner’ with your own site’s name.

If you require additional assistance, we also offer a comprehensive step-by-step tutorial on how to incorporate a privacy policy in WordPress.
Even if you have an existing privacy policy, consider revising it to include UCPA-specific information, clearly detailing user rights such as the Right to Know, Right to Delete, and Right to Correction.
Moreover, your policy should inform visitors about the methods to exercise these rights.
For instance, consider providing a link to a contact form where users can request access to their data or ask for its deletion.
Finally, establish a routine to regularly review and update your privacy policy. This assures it accurately reflects your current practices and remains consistent with any forthcoming changes to the UCPA.
Under the UCPA, consent for cookies is based on an opt-out model. Thus, you may use non-essential cookies without prior consent, as long as you furnish users with a straightforward option to opt out.
This contrasts with stricter regulations such as the General Data Protection Regulation (GDPR), which necessitates obtaining consent prior to setting non-essential cookies.
Note: It’s worth mentioning that sensitive data (for instance, details regarding race, religion, health, or exact geolocation) requires user consent before being collected (opt-in under UCPA).
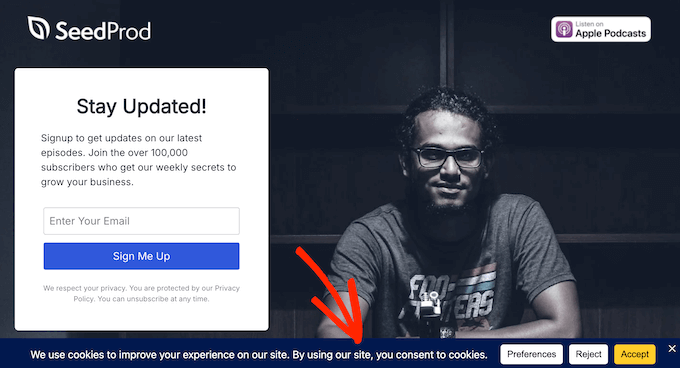
The positive aspect is that a cookie popup can facilitate compliance with both types of regulations.
A clear, user-friendly banner can inform visitors about the cookie types used on your site, the data they gather, and their purposes, while also providing a straightforward opt-out mechanism.
While several plugins offer cookie banners, WPConsent is my top choice for its user-friendly interface and support for multiple privacy laws, including the UCPA.
We utilize WPConsent on WPBeginner for managing cookie banners and monitoring user consent, and our experience has been exceptionally positive.
Curious to learn more about our application of WPConsent on WPBeginner? Be sure to check out our detailed WPConsent review.

To begin, simply install and activate the plugin.
Once active, WPConsent will automatically scan your site to identify all active cookies.
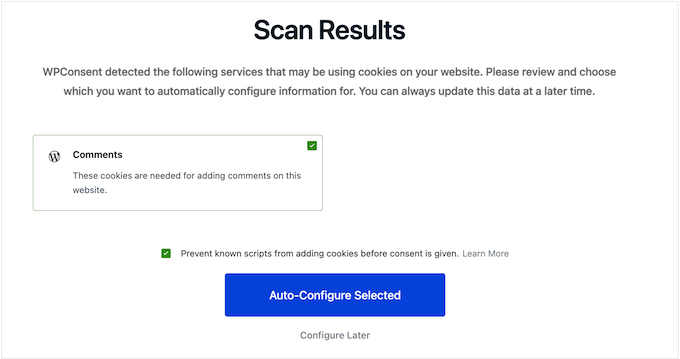
After the scan, a setup wizard will assist you in designing your cookie banner. Customise the layout, position, button styles, colours, and even upload your logo.
As you make adjustments, WPConsent will provide a live preview of how the banner will look on your site.

When satisfied with the design, save your changes, and the cookie banner will begin appearing on your WordPress site immediately.
For comprehensive instructions, refer to our full guide on adding a cookie popup in WordPress.
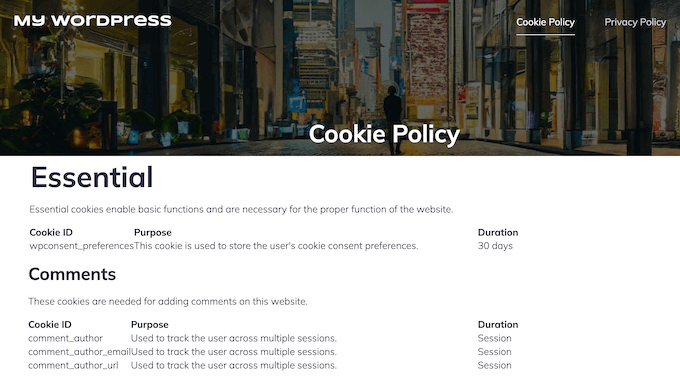
Create a Dedicated Cookie Policy
This aids visitors in comprehending the types of personal data your website collects and how it is utilised.
Your cookie policy should:
- Enumerate all cookie types your site uses (e.g., essential, analytics, marketing).
- Clarify the function of each cookie—for instance, some may track visitor activity or display personalised advertisements.
- Detail the data collected by each cookie, such as IP addresses or browsing history.
Maintain clear and simple language to promote understanding; avoid technical jargon or legal language whenever feasible.
Once your policy is ready, ensure it’s easily accessible—consider linking it from your main privacy policy and within your cookie banner as well.
Fortunately, WPConsent can streamline this entire process for you.
It can scan your website for cookies, then generate a cookie policy based on that information automatically.
To start, navigate to WPConsent » Settings.
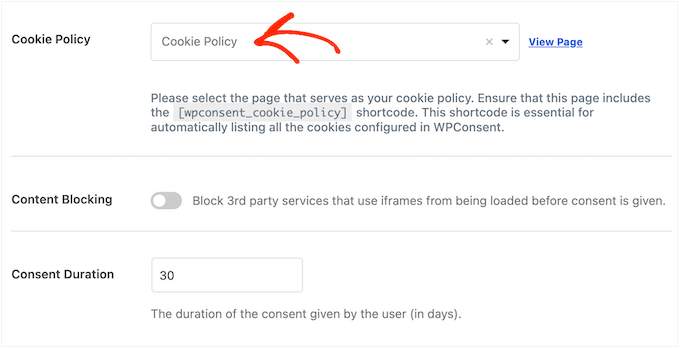
In the plugin settings, select the page for your cookie policy to appear.
WPConsent will then automatically add the policy to that designated page.
If you are currently using WPConsent for your cookie banner, your visitors can directly access the policy through the popup by clicking the ‘Preferences’ button.
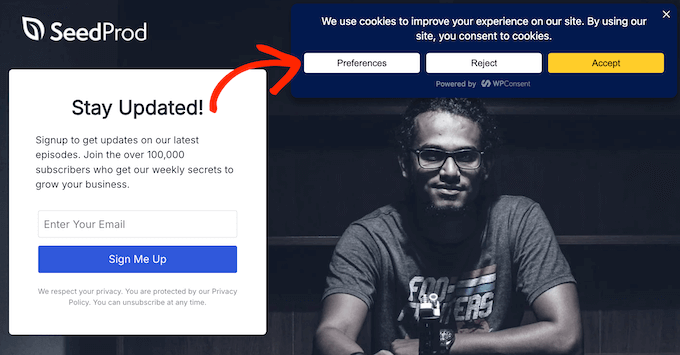
By clicking on the ‘Cookie Policy’ link, they can be directed to the full policy page.
Here’s an example of what that interface looks like.
Restrict Third-Party Scripts
One challenging aspect of the UCPA is its applicability to third-party tracking mechanisms such as Google Analytics or Facebook Pixel.
Although third-party services are responsible for tracking, you’re still accountable for how they collect and use visitor data on your site. Therefore, you must allow users to opt out.
One effective method to manage this is through automatic script blocking. This prevents tracking scripts from operating until users provide their consent.
This measure also reinforces the UCPA’s Right to Know by ensuring users are informed before any data collection takes place.
While the UCPA generally follows an opt-out structure, script blocking elevates compliance standards by making third-party tracking an opt-in process.
Fortunately, WPConsent simplifies this with its automatic script blocking feature, which identifies and blocks common tools like Google Analytics, Google Ads, and Facebook Pixel without compromising your site’s functionality.
Once a visitor consents, the plugin will immediately load the script without the need for a page refresh.
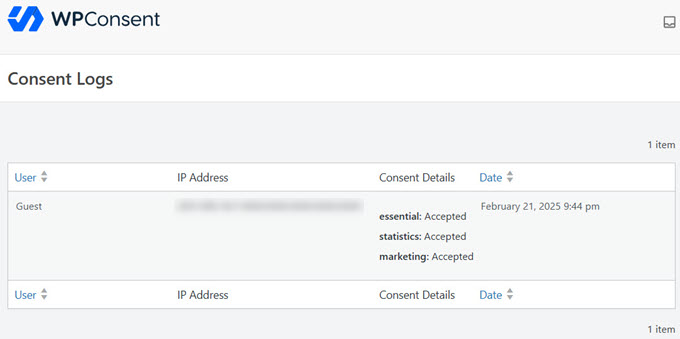
Monitor and Record Visitor Consent
Even with effective UCPA practices in place, you may still face inquiries. Regulators could request audits, or an individual may want to know how you are managing their data.
This is where tracking and logging user consent becomes essential. It provides you with tangible, time-stamped evidence that you are respecting each user’s preferences.
WPConsent automates this process, capturing vital information such as the user’s IP address, consent settings, and the precise date and time consent was granted.
To view this information, navigate to WPConsent » Consent Logs in your WordPress dashboard.
In case you need to present this log—for instance, during an audit or to a legal advisor—you can easily export it from your site.
Simply open the Export tab, choose your desired date range, and click the ‘Export’ button.
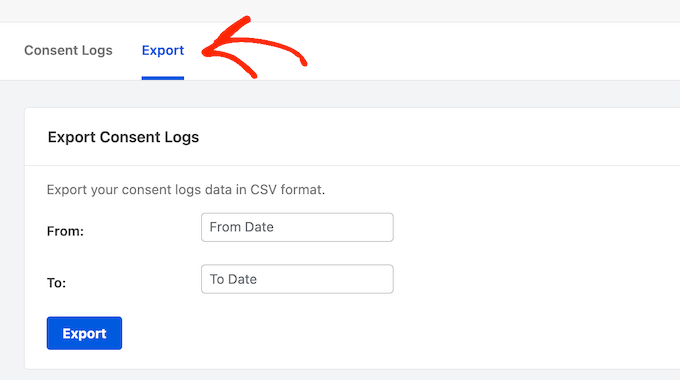
WPConsent will create a CSV file containing all the logged consent information, making it readily available for sharing when needed.
Provide Users an Opt-Out Option (Do Not Track Form)
The UCPA grants users the option to opt out of the sale or sharing of their personal information. It’s mandatory to provide a clear and straightforward method for this.
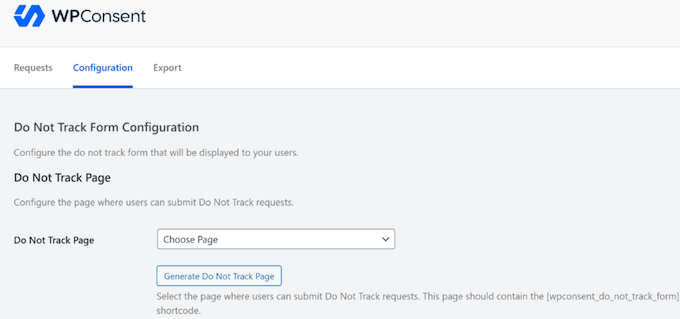
A convenient way to facilitate this is by using WPConsent’s Do Not Track add-on, enabling you to create a dedicated opt-out page in just a few clicks.
To get started, visit WPConsent » Do Not Track » Configuration in your WordPress dashboard.
WPConsent will guide you through the necessary steps to set up the add-on and create a Do Not Track form.
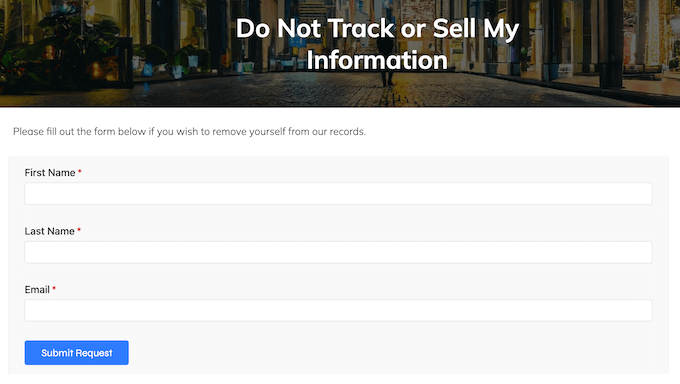
Once set up, users can fill out the form to opt out of data sharing or sales.
This allows users a simple way to exercise their rights while enhancing your site’s overall user experience.
Additionally, WPConsent securely stores these requests locally in a custom database table on your site, granting you full control over this sensitive information, without relying on external services.
This feature automatically logs each request, ensuring you have clear evidence of compliance if necessary.
Facilitate the ‘Right to Delete’
The UCPA allows users to request the deletion of their personal data.
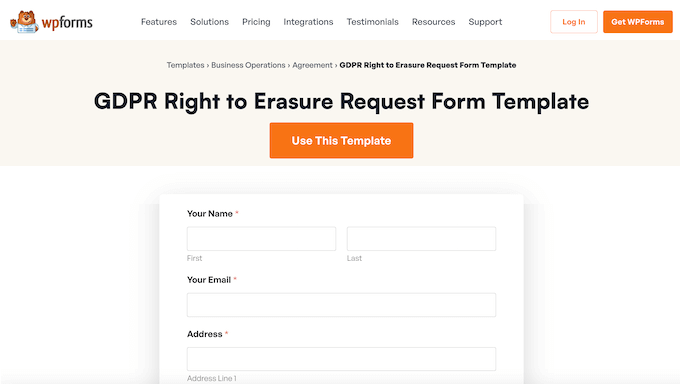
A straightforward approach to support this is to incorporate a data erasure form on your WordPress site. This will enable visitors to easily request data removal via a secure form.
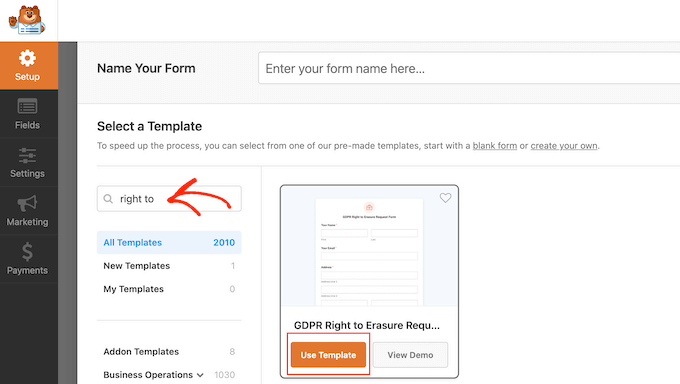
Here, WPForms comes into play. It offers a drag-and-drop builder featuring a pre-made Right to Erasure form template.
Though named after GDPR, rest assured that this template functions just as effectively for UCPA requests.
To utilise the template, visit WPForms » Add New.
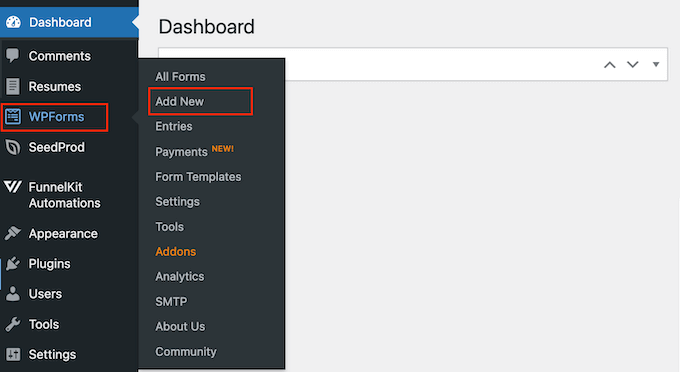
Next, type “Right to Erasure” into the search bar.
When the template appears, click ‘Use Template’ to open it in the WPForms editor.
From there, you can modify the form to suit your requirements. The left panel showcases various fields while the right panel provides a live preview.
To change a field, simply click on it in the preview, then adjust the label, instructions, or field type in the left panel.

Once satisfied with the form, click ‘Save’.
To embed the form in a page or post, open the editor, add a WPForms block, and select your saved form from the dropdown.
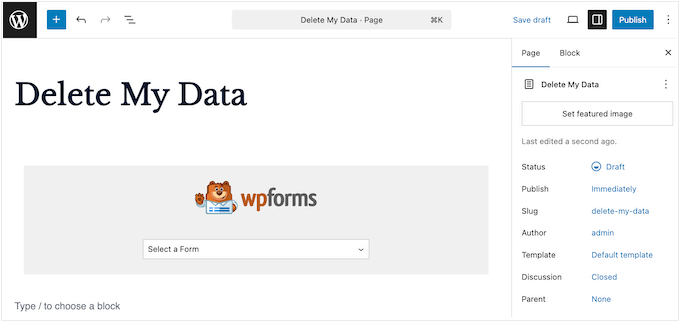
Then publish or update the page as usual.
At WPBeginner, we utilise WPForms across all our sites due to its reliability, user-friendliness, and flexibility for compliance tasks. For an extensive analysis, check out our comprehensive WPForms review.
Once your form is operational, ensure it is easily accessible. I would recommend linking it in your privacy policy or embedding it directly on that page.
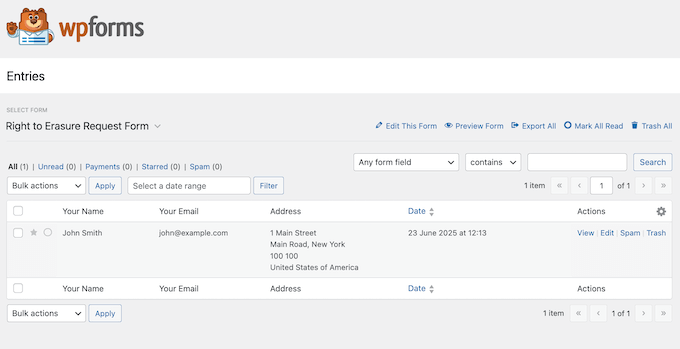
WPForms also features a built-in entry management system. This makes it easy to view and filter submissions, streamlining your tracking process for deletion requests.
To view entries, navigate to WPForms » Entries in your dashboard.
Simply locate your data erasure form and select it.
You will then see all the ‘delete data’ requests you have received.
When an individual requests deletion, WordPress includes a tool to assist. Simply navigate to Tools » Erase Personal Data in your admin panel.
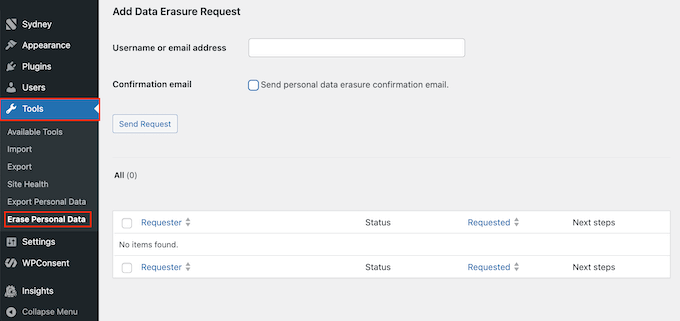
Submit the user’s email address or username, and WordPress will execute the deletion process.
You may also opt to send a confirmation email once the data is erased.

Facilitate Efficient Data Access Requests
According to the UCPA, users have the right to request a comprehensive copy of their data that your website has accumulated about them.
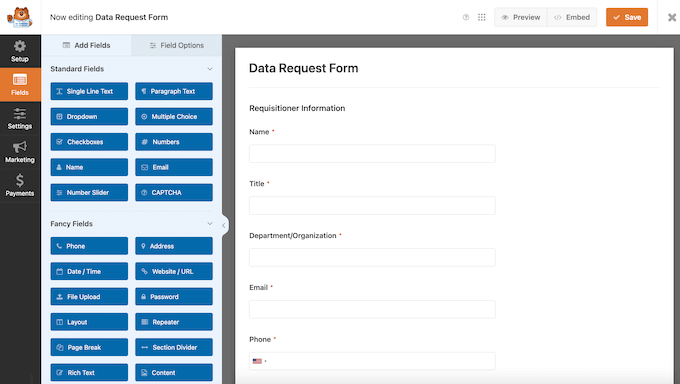
The good news is that you can assist this process by offering a dedicated data access form on your site using WPForms.
WPForms provides a template for a Data Request Form, designed to gather the necessary information to identify users in your database and address their requests efficiently.
WPForms will automatically record every submission in your dashboard.
To check them, go to WPForms » Entries.

When a request arrives, you can share the individual’s data using WordPress’s in-built functions.
Simply navigate to Tools » Export Personal Data in your admin dashboard.
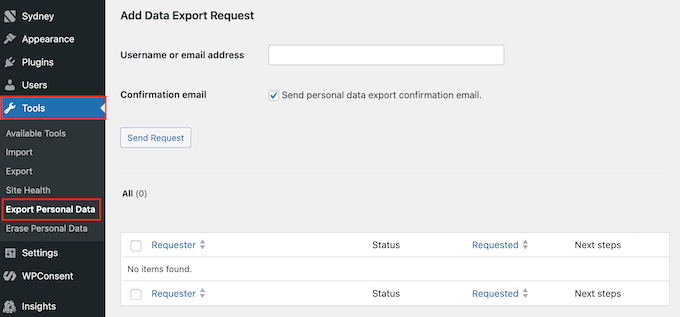
Type in the individual’s username or email address to locate the precise record.
Then share the .zip file containing their information with the requester.

This process assists you in fulfiling UCPA’s Right to Know mandate in a secure and user-centric manner.
Facilitate the ‘Right to Correction’
This might occur after a user reviews their data or they might contact you directly if their details, such as phone number or address, change.
The easiest way to manage these requests is by integrating a dedicated correction form on your website.
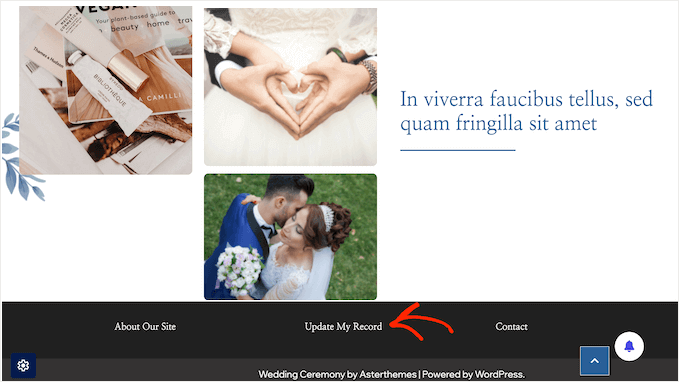
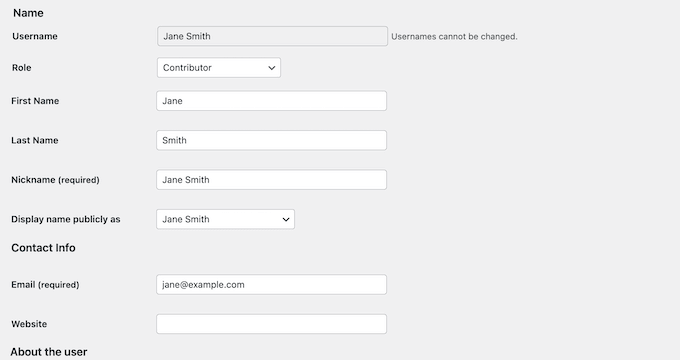
WPForms features a Personal Information Form template tailored for this purpose, which even includes an “Update Existing Record” option to assist in identifying correction requests.
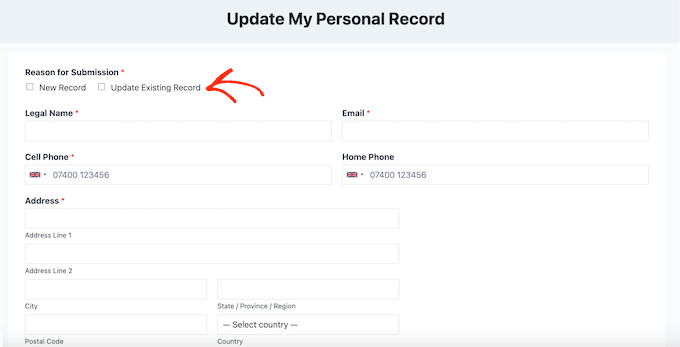
This template contains relevant fields such as legal name, nickname, email address, and phone number.
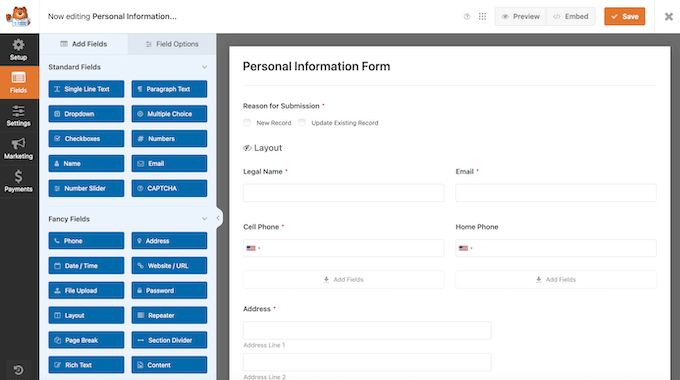
You can easily adapt the form in WPForms’ drag-and-drop editor to add extra fields as needed.
Once your form is published, ensure that users find it effortlessly.
I suggest linking to it from your privacy policy or placing it in the footer of your site.
As requests come in, handle them manually based on where the data is stored.
If the information is within WordPress, navigate to Users » All Users and select ‘Edit’ for the relevant profile.
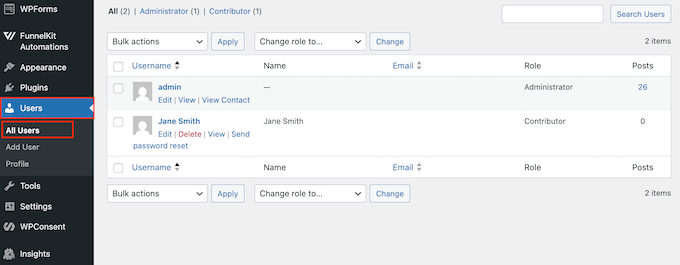
Make the required updates.
After that, scroll down and click ‘Update User’ to confirm the changes.
If data is stored in third-party applications like a CRM or an email marketing platform, simply log into that service to update the user’s profile.
Common Questions About UCPA Compliance in WordPress
Grasping the nuances of privacy laws can initially seem overwhelming. If you still have questions regarding how the UCPA impacts your WordPress site, you’re not alone.
Here at WPBeginner, our goal is to empower you with confidence on compliance matters. In this section, I’ll address some of the most frequently asked questions we receive from our readers.
What are the consequences if my WordPress site isn’t UCPA compliant?
Failing to comply with the UCPA may result in penalties that can go as high as $7,500 per violation. There is also a risk of customer complaints or triggering regulatory investigations, both of which could harm your business reputation.
How often should I check my site for UCPA compliance?
As privacy laws can evolve, it’s prudent to review your compliance at least annually or whenever changes occur in how your site collects or utilises data.
For optimal results, consider integrating this review into your routine WordPress maintenance checklist.
Can I use similar compliance tools for UCPA and GDPR?
Absolutely, a competent compliance tool should cater to multiple privacy laws. For instance, WPConsent can assist you in adhering to the UCPA, GDPR, the Brazilian General Data Protection Law (LGPD), and Australia’s Privacy Principles (AAP), among other jurisdictions.
However, remember that each tool is distinct. Therefore, it’s essential to conduct your research to ensure you are meeting specific regulations.
Further Resources for UCPA Compliance
Adopting a proactive stance and continuously broadening your knowledge is vital for maintaining long-term UCPA compliance. Given that data privacy laws can shift, staying updated is crucial for protecting your website and audience.
To assist you in this endeavour, I’ve compiled several valuable resources you can explore to enhance your understanding and keep your WordPress site compliant:
I hope this comprehensive beginner’s guide to WordPress UCPA compliance has clarified this important privacy legislation for you. You might also find our expert recommendations for the top WordPress security plugins helpful, or consider reviewing our guide on keeping personally identifiable information out of Google Analytics.
If you found this article helpful, consider subscribing to our YouTube Channel for more WordPress tutorials. Connect with us on Twitter.
Share this content: