Split Azure Costs with Billing Profiles for Departments or Products

As an Independent Software Vendor (ISV) or a Small to Medium Business (SMB), you may notice that as your business flourishes, your Azure spending tends to rise in tandem, especially as you increasingly utilise cloud services.
When you initially set up Azure, you might have opted for a Pay-As-You-Go plan using a credit card. However, once your billing amount escalates, you may find yourself pondering how to manage your Azure bill effectively. This could prompt considerations such as:
- Is it time to switch to a Microsoft Customer Agreement (MCA) or a Cloud Solution Provider (CSP)?
- Should we explore Wire Transfer options?
- Would splitting our bill be beneficial?
Business Scenario
In our scenario, we are operating under an MCA, but require our bill to be divided into several invoices for improved internal processing. Additional challenges may present themselves, such as:
- Reconciling invoices in accounting software (like Xero) can be cumbersome as a single Azure invoice makes it difficult to differentiate expenses across various teams, departments, and products.
- Credit card payments have a per-invoice limit capped at $50,000 on the Azure side.
- Your credit card provider may impose restrictions on the size of individual transactions.
Your Finance Team may employ a shared service used for managing finances across different products. This involves handling customer invoices, payments, internal costs, and processing the Azure bill.
Dividing Your Bill Across Multiple Billing Profiles
If you have an MCA and are settling payments via credit card, one viable option is to obtain multiple invoices.
You’ll have access to a Billing Account within the Azure portal where all your subscriptions are organised under a billing profile.
Within this Billing Account, you can create distinct invoice sections. This allows you to itemise costs, ensuring that each section’s invoice clearly identifies related expenses.
However, as your bill grows more complex, you might desire a more streamlined approach for your finance team, and this is where Billing Profiles are advantageous.
Setting up multiple Billing Profiles lets you assign subscriptions accordingly, resulting in one invoice per profile. This structure simplifies your accounting efforts by enabling precise allocation of costs to specific products, departments, or business segments.
How can I do this?
The following steps outline how to create a new billing profile.
Creating a New Billing Profile
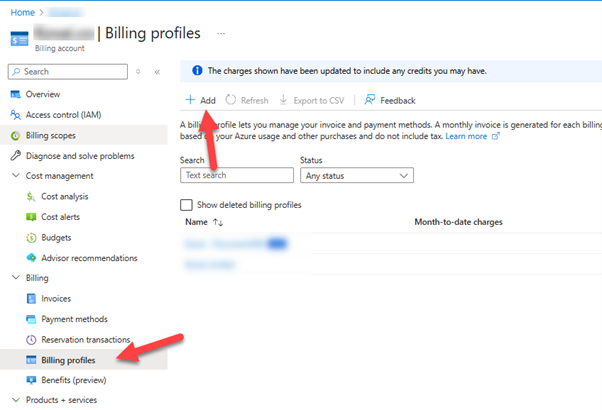
- Navigate to the Cost Management + Billing section.
- Click on the Billing profiles blade.
- Select Add.
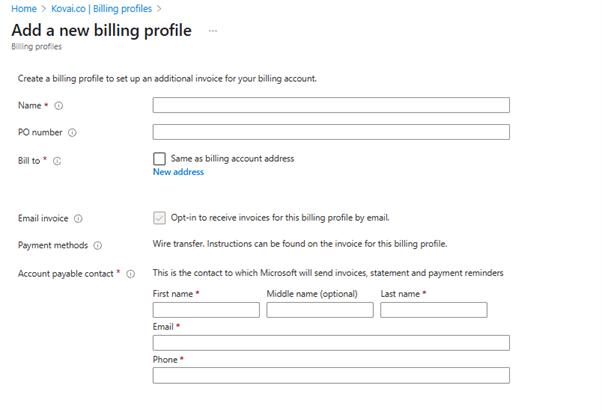
- Complete the form provided.
- Select Create.
Transitioning Existing Subscriptions to a New Billing Profile
To transfer existing subscriptions to your new billing profile, follow these steps:
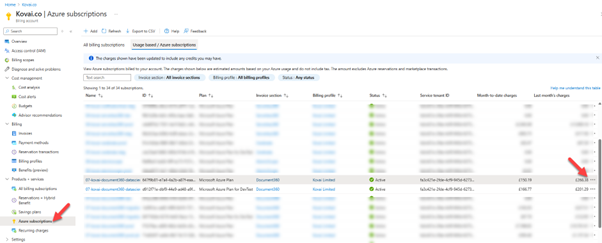
- Go to the Cost Management + Billing section.
- Access the Azure subscriptions section.
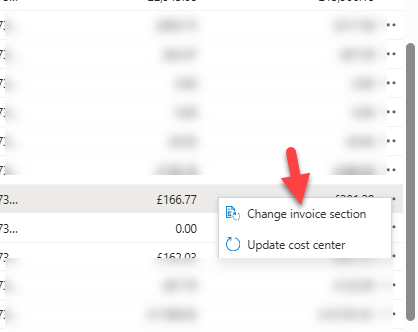
- Click the three dots next to the desired subscription.
- Select Change Invoice Section.
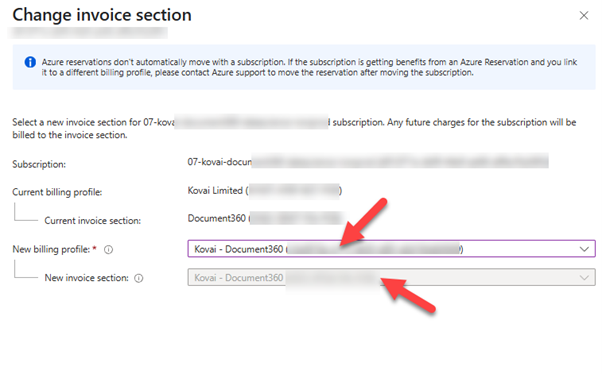
- In the subsequent window, update the billing profile to reflect the new profile and select the correct invoice section.
- Select Save.
You’ll need to repeat this process for each subscription you wish to allocate to the new billing profile.
What if I need to dig deeper into my costs?
Once you’ve streamlined the process for your Financial Controller, you might find that Billing Profiles alone do not provide enough insights to manage and optimise your costs effectively.
At Turbo360, we can maintain visibility of all Azure consumption across different billing profiles and delve further into the costs associated with each invoice categorically according to teams and departments. Here’s what you can do:
- Dissect costs into teams/departments using physical dimensions like subscription and resource group, or by applying virtual tags.
- Continuously monitor your expenses.
- Align actual costs with projected expenses.
- Implement cost optimisation strategies.
Conclusion
As your business expands, you may wish to reorganise your Azure expenditures for more efficient allocation and processing across various departments.
In this situation, having moved past basic invoice sections, employing different billing profiles allows you to entirely segregate costs onto individual invoices. This structure enables finance specialists to manage budgets for each team effectively.
Share this content: